
Non-manifolds : Manual Fixing Methods
Difficulty: Intermediate
Objective: Learn various methods of how to fix non-manifolds. It is almost always better to fix non-manifolds manually because you do not lose the shape of your model. It is very difficult for a computer to automatically fix all types of non-manifolds at once because there are various types that require different treatments.
To learn about Non-manifolds and the types see: Non-Manifolds: Your Worst 3D Printing Nightmare
Automatic methods can be found here: Non-Manifolds Automatic Fixing Methods
Non-Manifold Video Tutorials
To learn about Non-manifolds and the types see: Non-Manifolds: Your Worst 3D Printing Nightmare
Automatic methods can be found here: Non-Manifolds Automatic Fixing Methods
Non-Manifold Video Tutorials
1.) Blender

- First you need to find the non-manifold: This can be done in Blender, in Edit Mode, by doing finger yoga pushing, [Ctrl]+[Shift]+[Alt]+[M] and the non-manifolds will become selected, highlighted. (You need to been in vertex selection for this to work, and wireframe view may help you spot the non-manifolds) Note: This will note find all the non-manifolds.
- (Better Option) Or you can install the Add-On, "3D Print Toolbox", Which I believe is essential for 3D Printing. This does an amazing job helping you avoid 3D Printing errors.
- Determine which type of non-manifold it is. This is done by wiggling the non manifold vertices until the problem can be seen. To see the types of non-manifolds see : Non-Manifolds: Your Worst Nightmare
- Fix the non-manifold using the following methods:
- Duplicate Vertices Non-Manifold:
Many problems occur because there are 2+ vertices on top of each other, when there should only be one. Text often has this problem. In the picture below, each of these highlighted vertices has an extra vertex in the same spot. By clicking remove doubles on the left hand side, it will fix this non-manifold. Note that only the selected vertices will be removed, hence you may want to select everything and then push "Remove Doubles". At the top center of Blender, you can find how many vertices were removed.
This can also be done a more custom manner by selecting 2+ vertices and then merging them together, by using the hot key [Alt]+[M], and choosing from that menu how to merge the vertices.

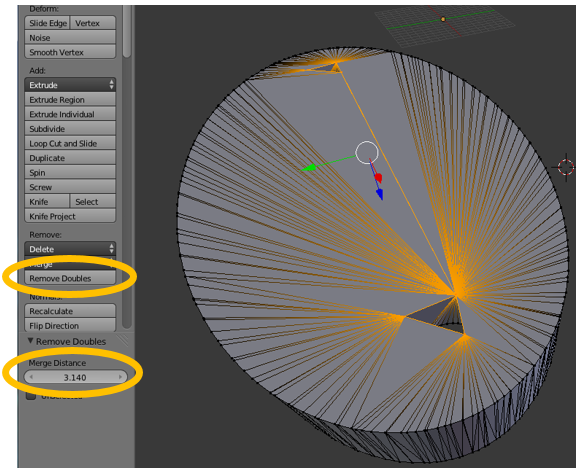
Essentially the "Remove Doubles" Tool mentioned previously is doing this just this. It finds vertices within a certain distance to each other and merges them together. To change the setting on how close vertices are to be affected by "Remove Doubles", you can adjust it after you push "Remove Doubles" and then change the merge distance as seen in the picture below. Note how the higher merge distance the more vertices will be merged together, and the more the object alters it's original shape. This can be seen in the image below as the circles went to triangles as the merge distance increased as opposed to the previous image.
 I will also mention that you can turn on a setting to automatically merge your vertices in Blender by going into Mesh-->AutoMerge Editing
- Hole Non-Manifolds:
These can be fixed by manually manipulating the geometry (deleting, filling, merging, etc).

Another more automatic way to fix holes is to go into Mesh --> Clean Up --> Fill Holes. Then depending on how big your hole is you may need to change the vertices count number in the bottom left as seen below. (For example if you hole has 8 vertices, then the number will need to be at least 8)

- Separate Part Non-manifold
These are fairly simple, you can just select the separate part and delete it (with [L]) . For more info see this post: How to Split & Separate a Model in Blender
- Intersecting Non-Manifold:
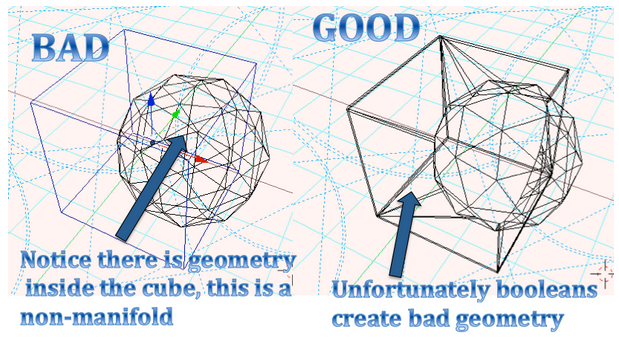
This is perhaps the most common, sneakiest non-manifolds of them all as it may not be detected as a non-manifold by the program. If you have multiple objects that intersect each other then you will need to fuse them together to create one part, not multiple parts intersecting one another. To learn how to fuse your separate objects together, see this post: http://3dprintingninja.blogspot.com/2014/11/boolean-trouble.html
Otherwise you will need to delete the faces and combine the two geometries into one, which is not an easy nor quick task.
- Infinitely Thin Non-Manifold:
Solidify Video Tutorial

This is technically a hole, but I choose this picture to show that an infinitely thin plane is any of the faces of this cube. To keep this shape (meaning keep 5 sides and not fill the hole) and fix this, you can use a "Solidify Modifier" in Blender that will thicken the faces of this cube, which will inadvertently fix the non-manifold. (You could also extrude all the faces as well...) This is shown in the image below.

- Inner Faces Non-Manifolds:
The best way is to just delete these faces manually. However there is a automatic way which may work by going into "Select" --> "Interior Faces"

- Sculpting to fix Non-Manifolds:
Sculpting can often fix-non-manifolds as it can also create them. However with the right touch it can be a great way to fix some non-manifolds. Review the tutorial on "Blender : Sculpt Mode" for more information found here: http://3dprintingninja.blogspot.com/2014/12/blender-curriculum-video-tutorials.html
Please leave your comments.
and as always thanks for visiting,The 3D Printing Ninja
3DNinjaneer@gmail.com
Category: Basics, Blender, Non-manifolds, Trouble Shooting


%2B(1).jpg)


0 comments