
Difficulty: Noob


The 3D Printing Ninja
3DNinjaneer@gmail.com
Objective: Learn how to hide elements to make your workflow easier.
1.) View

This should be obvious, but if not one reason to hide items is so that you can better view your screen. To hide items you can go in the object window and push the eye button or use the hot-key [H]. To unhide the item you can push the eye again or use the hot-key [Alt]+[H].
An example of why you would want to do this is say you have an object in front of another object that you want to manipulate. Instead of messing with your view simply hide the item.
2.) Sculpting
Sculpting can get really messy when you only want to sculpt part of the model. It is hard to not affect parts of the model without hiding it. When you hide things while sculpting, it's like you don't have to color within the lines, you can be as messy as you want. Once again the hotkey to hide is [H] or [B] and you will just need to draw a box to select what you want to hide. Keep in mind that you can use [B] or [H] + [Shift] to invert the selection.
It also is easy to hide geometry by making vertex groups. Then you can quickly select the vertex group to hide or show only.
3.) Memory
The last reason that I can think of why you would want to hide items is because your computer will run faster. When your scene begins to get complex it will start to slow down. If you don't need to see it, then hide it and it won't slow your computer down.
Please leave your comments.
and as always thanks for visiting,The 3D Printing Ninja
3DNinjaneer@gmail.com
Difficulty: Noob


[B] This is an excellent method to select that allows you to draw a box around what will be selected. This is especially useful when using it in a view such as front view [1] (and orthographic [5]). Remember that you can also deselect with box mode with [Shift]+[B].
[C] This will allow you to color over your model and anything within the circle will be selected. You can adjust the circle size by scrolling. When finished with your selection push [Enter] to apply or [Esc] to exit.
[Ctrl] + [Right Click Drag] Draw the shape around what you want to select.
This is a really awesome feature that you will need to know for more advance use of blender. Here are the steps which can also be seen below:
This is not a selection, it is view that will make selection easier. You can go into wireframe with [Z] or using the button seen below. Note that your selection will be both the front and back of your model now.
Another way to select everything in front and in back is to turn on the see through feature by pushing the button. Your model will go see through as seen below.
[L] This is extremely useful as it will guess selections for you. An example is when you want to split an object into two you can use this to select the object. You can also slowly adjust the selection with [Ctrl] + [+] or [-] to grow or shrink it as seen below.

The 3D Printing Ninja
3DNinjaneer@gmail.com
Objective: There are many ways of selecting in Blender. This post goes over the various methods and explains why certain methods are preferred in certain situations over others. The methods are ranked by the most used to least used method.
Right Click Selection
[Right Click] is the way to select something, as this may not be intuitive. As you select something the object with become highlighted.
Multiple Selection
To select multiple objects [Shift]+[Right Click].
Deselection
If you [Right Click] on an already selected item than it will deselect it. The important note here is that [Shift]+(any selection method)= deselection In addition if you accidentally select something you can always undo with [Ctrl]+[Z]. Or redo with [Shift]+[Ctrl]+[Z].
Select All
[A] to select everything. [A] again to deselect everything.

Edge Loop
[Alt] + [Right Click] on an edge between two vertices. This will only work as well as your topology is.
Vertices, Edges, Faces
Usually you should select the vertices, but occassionally it is smart to select the faces or edges. This can be done by changing what you want to select as seen in the image below. This can also be done witht the hotkey [Ctrl]+[Tab].
 Box Selection
[B] This is an excellent method to select that allows you to draw a box around what will be selected. This is especially useful when using it in a view such as front view [1] (and orthographic [5]). Remember that you can also deselect with box mode with [Shift]+[B].

Circle Selection
[C] This will allow you to color over your model and anything within the circle will be selected. You can adjust the circle size by scrolling. When finished with your selection push [Enter] to apply or [Esc] to exit.

Lasso Selection
[Ctrl] + [Right Click Drag] Draw the shape around what you want to select.

Vertex Group Selection
This is a really awesome feature that you will need to know for more advance use of blender. Here are the steps which can also be seen below:
- Make your Selection
- Go into the Object Data Menu
- Click on the Add button to create a new vertex group
- Name your vertex group (optional, but makes it easy to work with)
- Click assign to make your selection apply to the vertex group
- At any point in time you can select this vertex group

Wireframe
This is not a selection, it is view that will make selection easier. You can go into wireframe with [Z] or using the button seen below. Note that your selection will be both the front and back of your model now.

See through selection
Another way to select everything in front and in back is to turn on the see through feature by pushing the button. Your model will go see through as seen below.

Linked Selection
[L] This is extremely useful as it will guess selections for you. An example is when you want to split an object into two you can use this to select the object. You can also slowly adjust the selection with [Ctrl] + [+] or [-] to grow or shrink it as seen below.

Invert Selection
[Ctrl]+[I] will make what you have selected and deselect that and make everything else selected.Random & Pattern Selections
There are also many other methods of selection which you can find within the select menu. The two I will highlight in this post are Random and Checker. Note that you can change the settings of the random select with the small options tat appera in the bottom left hand corner.


Inner Loop Selection
First select an edge loop, as mentioned earlier, then go into the select menu and choose "select loop inner-region" as seen in the image below.
Please leave your comments.
and as always thanks for visiting,The 3D Printing Ninja
3DNinjaneer@gmail.com
Difficulty: Noob
Objective: Learn about Autodesk Shapeshifter, a website that allows you to quickly make complex models.

What is Autodesk Shapeshifter?
Autodesk is my favorite software company when it comes to 3D Design. Autodesk Shapeshifter is a website where you can quickly design a model to be printed with a patter about it. The process is easier than you think, and yet there is still a lot of control that you can choose for the shape of the model (don't skip the advanced controls on the right hand side). I have used this site to make gift napkin rings to just a general shaft on a lamp. I highly recommend it.
Advantages:
- User Friendly
- Quick & ready to export
- Exporting options
- Controls
Disadvantages:
- Limited Templates (ring, bowl, snake, etc.)
- Can't import in your own objects
Please leave your comments.
and as always thanks for visiting,The 3D Printing Ninja
3DNinjaneer@gmail.com
Difficulty: Noob
Objective: If your object is not rotating, transforming, scaling, etc. as you wish it may be because your origin is not where you want it. This post goes over how to adjust the position of the origin of an object.


The 3D Printing Ninja
3DNinjaneer@gmail.com
Objective: If your object is not rotating, transforming, scaling, etc. as you wish it may be because your origin is not where you want it. This post goes over how to adjust the position of the origin of an object.
Origin vs. 3D Cursor vs. Cursor
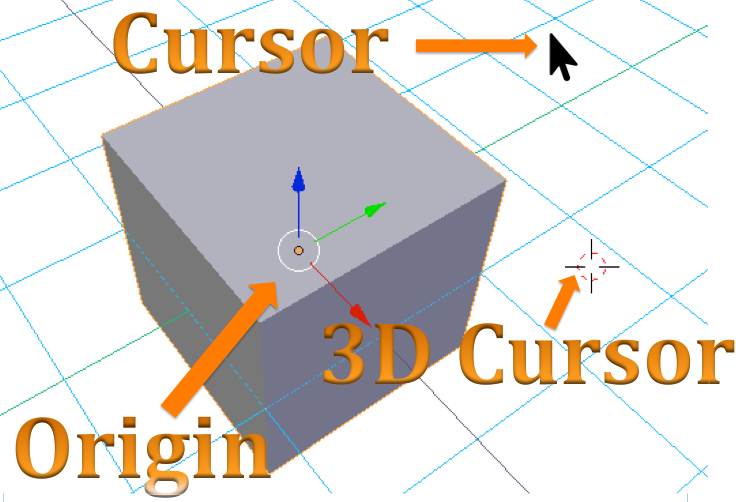
In the Properties Window [T], you can adjust your object by changing you origin. For example if you relocate the origin 5 units to the right, it also therefore moves the object 5 units to the right since your object is dependent on the its origin. The origin is that little orange dot that you see in the picture above. (It may not be even near your object as it can be anywhere.)
Your cursor is what allows you to select and actually do anything. Your 3D cursor is like your cursor, only that you can leave the 3D cursor behind and continue using your cursor.
(If you right click in the box you can reset values to default, which will center your origin or 3D cursor to the center.)
Choose the Origin
If you added a mesh from blender, your origin is in the center of your object. This is usually ideal, but sometimes you may want to move the origin. In Edit Mode, choose a vertex which you would like to become the new vertex and select it. With practice you will understand where you want your origin.
Move the 3D Cursor to the Desired Origin
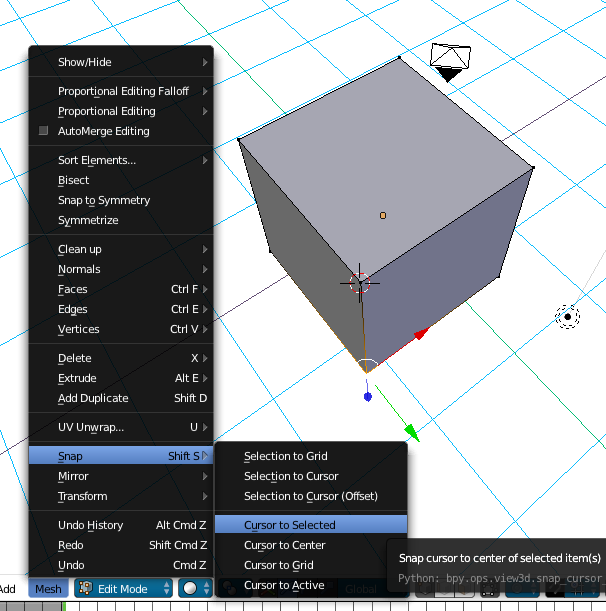
Next, "Mesh"--> "Snap" --> "Cursor to Selected". This will move the 3D cursor to that vertex.
Change the Origin to the 3D Cursor
Now go into Object Mode, an then "Object" --> Transform" --> "Origin to 3D Cursor". Now you have change the origin of your object. Note that you can also choose "Origin to Center of Mass" which puts the origin back to the center of your object.
Please leave your comments.
and as always thanks for visiting,The 3D Printing Ninja
3DNinjaneer@gmail.com
Difficulty: Noob
Objective: If you have never used Blender before and want to know where to start learning how to, this video was made just for you. It was inspired by Tunapanda, whom I will give a shout-out to, and you can find more information about them here: http://www.tunapanda.org.

Noob
These are the video tutorials to learn blender (in recommended order). If there is no link, then that means the video will be uploaded in the near future.
Intro, Dive In:
Object Mode:
Edit Mode:
- Selection
- Scale, Rotate, and Move
- Proportional Editing
- Extrude, Delete vs. Dissolve, Merge, & Fill
- Join, Separate, and Split Parts (Knife Tool)
- Edge Loop
- Mirror
- 3D Printing Checks
- Creating an arm
- Curve Modifiers
- Grid Fill
Sculpt Mode:
- Brushes
- Symmetry
- Background Image
3D Printing:
- 3D Printing Tool-box
- Measuring
Rendering:
- Camera
- Lighting
- Materials
- Textures
- Compositor
Animation:
- Simple Animation
- Rigging
- Collisions
- Cloth
- Liquid
- Smoke
Intermediate
- Retopologize
- Curves
- Arrays
Advanced
- To be Announced
Additional Materials
You can download the curriculum and hotkeys for Blender online here:
Blender Hotkeys
Blender Curriculum
You can download the powerpoints for Blender online here:
Blender: Object and Edit Mode
Blender: Sculpting
Blender: Animation
Blender Curriculum
You can download the powerpoints for Blender online here:
Blender: Object and Edit Mode
Blender: Sculpting
Blender: Animation
Other Useful Tutorials
- If you have questions about Blender this is the best site: http://wiki.blender.org
- I highly recommend looking at these tutorials for modeling, although not necessarily for 3D Printing: https://www.youtube.com/user/AndrewPPrice
- This site also has good tutorials: http://cgcookie.com/blender/
Please leave your comments.
and as always thanks for visiting,The 3D Printing Ninja
3DNinjaneer@gmail.com
Difficulty: Noob


Objective: Understand what a raft is and when to properly use it.
What is a raft?
Rafts are similar to supports in the sense that they break off after printing. However supports are necessary, where as rafts simply enhance the quality of the print. A raft is extra material added to the print bed to print the object on.
Why should I use a raft?
1.) Reduce Warping
The most common reason for a raft is to absorb the warping so your object doesn't. Even though your object will still warp, it won't warp as bad. Seen below is the same object printed with and without a raft, except the job without a raft was canceled mid print. Notice the curl.

2.) Balance a Tall Object
This has to do with my Wiggle theorem, but suffice it to say it is bad if your object isn't stable. Therefore to stabilize your object you can add a raft to help it print better.
3.) Get an Object to Stick to the Bed Plate
Sometimes it can be difficult to get your print to actually start printing because it won't stick to the plate. There are solutions to this found in another post. However you can easily cheat the fix by simply adding a raft that the object will stick to.
When not to use a raft?
1.) Thin Objects
Rafts are easy to break off with a tall object, however when the object gets small you lose a lot of your leverage power, an it can be very difficult to break off the raft. In addition you may be just as likely to break your model as you are able to break the raft of.
2.) To Keep a Smooth Face
The best texture of your 3D printed object will usually always be the face of your object that lays flush with the print bed. By using a raft, that face will no longer lay on the bed, but flush with the raft.
Please leave a comment.
And as always thanks for visiting
3D Printing Ninja
3DNinjaneer@gmail.com
Difficulty: Noob
Objective: Although there are many different CAD programs, they each are very similar to one another. To get started with any CAD software, these are all the tools I would learn.
Objective: Although there are many different CAD programs, they each are very similar to one another. To get started with any CAD software, these are all the tools I would learn.
Sketch
Everything starts from a sketch. From a sketch you can use various tools to make a 3D model. To make a sketch you first need a plane or face to sketch onto. The you can use various methods such as line, spline, circle, etc. to draw a sketch. Make sure your sketch is enclosed, otherwise it will fail. You should always dimension your sketches to be fully constrained, it will save you frustration later on, trust me.

Dimensions
If you ignore dimensions, then I don't know why you are even using a CAD program. Being able to add dimensions onto your sketch and model is the best thing to get in a good habit of.
What is fully constrained?
I always say you can test a sketch to see if it is fully constrained by wiggling all of the elements. If anything moves than that part needs a dimension to constrain the model. Basically dimensions limit what the sketch can do. You add dimensions on your sketch until your sketch is static and can't move anywhere. This also will save you frustration later down when tools fail. The best habit to get into right out of gate with these programs is a fully constrained sketch every time.


Note: For most tools you can choose to add or subtract. So you can add the extrude to the object or subtract the extrude to the object as seen below:


For more information you can download my powerpoints under "Classroom Powerpoints"
http://guides.lib.byu.edu/content.php?pid=529916&sid=4360174
Extrude
The basic of basic tools is an extrude, which takes your sketch and moves it straight to make a 3D object. It's the same as a sweep with a straight path. This is probably the most common tool.
Note: For most tools you can choose to add or subtract. So you can add the extrude to the object or subtract the extrude to the object as seen below:
Revolve
This requires a sketch and an axis to rotate the sketch around. This would be like a sweep but with a circle path. Between extrudes and revolves alone, mostly things can be made.
Sweep
I will start with the sweep because I think if you understand this tool then you can understand the others easier. A sweep is what I call the "snake tool" and requires a sketch and a path. The sketch then will follow the path, creating a 3D object. For example: sketch=circle and a path will make a tube like shape.
Loft
When I think of loft, I think of an airplane wing. This tool takes multiple sketches and blends them together. So if the first sketch is a circle and the second is a star, this will create a 3 model that starts of looking like a cylinder and then gradually changes into a star shape.
Chamfer / Fillet
I think of this tool as softening the edges so they aren't so sharp. These not only make you model look good, but they are also make your model more comfortable a safe. And it also makes your model stronger as stresses tend to love to gather in sharp edges.
Shell
Think hollow. For 3D printing, the default on your printer automatically shells your object to save on material. But you can always change to setting to print solid, or the thickness to how you shelled your model.
Split
When it comes to 3D printing and you only use PLA or ABS, this tool will be your best friend. You can print models that would need supports without any by printing your model in parts and then connecting the parts afterwards. I do this all the time and highly suggest it, to avoid supports.

For more information you can download my powerpoints under "Classroom Powerpoints"
http://guides.lib.byu.edu/content.php?pid=529916&sid=4360174
Please leave a comment.
And as always, thanks for visiting.
3D Printing Ninja
3DNinjaneer@gmail.com
And as always, thanks for visiting.
3D Printing Ninja
3DNinjaneer@gmail.com
Difficulty: Noob
Objective: Learn how to save time by using and modifying models and other items already made by others.

I have lived in several countries often relying on the compassion of strangers. I have personally learned that most all people want to help and be your friend. One of my favorite quotes is from the book, The Alchemist by Paulo Cohelo, "When you really want something to happen, the whole world conspires to help you achieve it.". In the 3D printing world, this is definitely true. Think of everything you can download as things people have made just for you. They are all helping you, so don't ignore them.

One of the beautiful things about 3D printing is the collaborative and shared nature of it. Here are some leading sites where you can obtain models for free.

There are already so many models available for free to download. Just like you can find any song online, soon you will be able to find any model online. Make sure you read the comments and reviews as anyone can upload a file. Also note the file type.
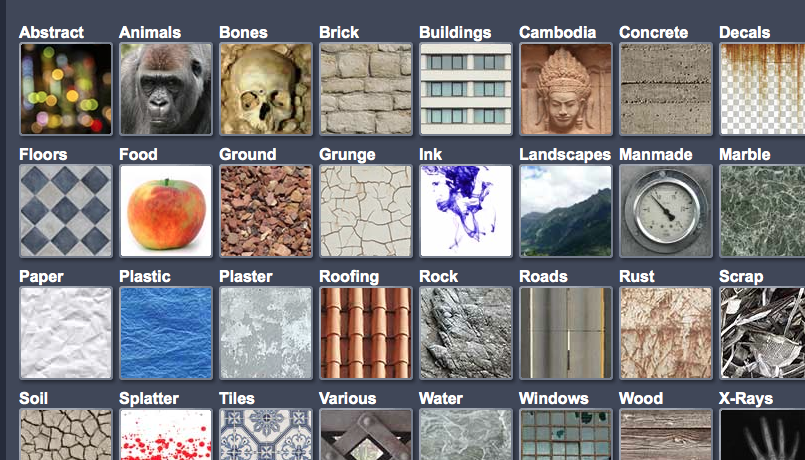
You can easily put any texture on your model. There are tons of images to use to make textures and software like Gimp to edit them or free. Software like Bump will make various textures automatically. You are always free to take your own photos and use your own designs, but so many are available that there probably isn't a reason to.
Sometimes the model you find is just what you need. Other times you may modify or personalize it I fit your needs. My favorite is times you may combine models, or take parts of several models and combine them. People often think that creativity comes from our individual ideas. But I strongly believe creativity comes from our experiences. And so creativity with 3D modeling is taking ideas and combining them. For example using a multitool pocket knife, with a phone case, with a wallet, with an elephant. Now that would be quite a creative, beautiful, and useful iPhone case.
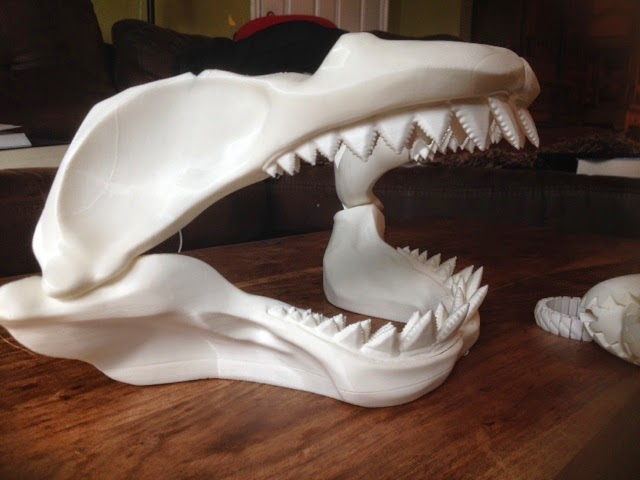
A personal example is a present I gave to my family combining the jaws of a shark, speaker, with an iPad. I found all these models online and using booleans to intersect them I came out with this iPad holder.

There is a really good example of a company supporting the 3D moment with the Nokia Lumina 820 cell phone. The company released a model of the case to the public. Then people started modifying the case and sharing their models online in thingiverse. Here is the link:
http://www.thingiverse.com/thing:43096
Eventually instead of people calling in to order a replacement part, they will simply download the part and print it. There will be no need to bother calling the business, no need for waiting weeks to obtain the part, and no need to pay for shipping costs. Convenience is King! Without any legal protection for businesses and people 3D printing their parts for personal use, this is bound to happen.
The 3D Printing Ninja
3DNinjaneer@gmail.com
Objective: Learn how to save time by using and modifying models and other items already made by others.
People Naturally Want to Help You
People are Sharing their Work
Thingiverse, TurboSquid, and Other Model Databases
CG Textures, Flickr, Image Searches
You can easily put any texture on your model. There are tons of images to use to make textures and software like Gimp to edit them or free. Software like Bump will make various textures automatically. You are always free to take your own photos and use your own designs, but so many are available that there probably isn't a reason to.
Sometimes the model you find is just what you need. Other times you may modify or personalize it I fit your needs. My favorite is times you may combine models, or take parts of several models and combine them. People often think that creativity comes from our individual ideas. But I strongly believe creativity comes from our experiences. And so creativity with 3D modeling is taking ideas and combining them. For example using a multitool pocket knife, with a phone case, with a wallet, with an elephant. Now that would be quite a creative, beautiful, and useful iPhone case.
A personal example is a present I gave to my family combining the jaws of a shark, speaker, with an iPad. I found all these models online and using booleans to intersect them I came out with this iPad holder.
Businesses are Starting to Give Out Their Models
Although only a few businesses have started sharing their models openly, I hope and believe more and more companies will start to do this. I don't think businesses have a choice because someone will reverse engineer the part, especially those with the access of a 3D scanner. I personally have done this with my iPhone case. My Incipio IPhone 4 case broke, so I made a model, and uploaded it on Thingiverse to share with everyone. Instead on spending $20 for their case anyone can print mine for $2 (cost of material). Personally I have modified the case and have several versions. I can have 10 customized versions for the price of a new one. Here is my phone case:There is a really good example of a company supporting the 3D moment with the Nokia Lumina 820 cell phone. The company released a model of the case to the public. Then people started modifying the case and sharing their models online in thingiverse. Here is the link:
http://www.thingiverse.com/thing:43096
Eventually instead of people calling in to order a replacement part, they will simply download the part and print it. There will be no need to bother calling the business, no need for waiting weeks to obtain the part, and no need to pay for shipping costs. Convenience is King! Without any legal protection for businesses and people 3D printing their parts for personal use, this is bound to happen.
Is it Stealing?
No, in the 3D printing world, all is shared freely and openly. There are people who charge for their models, but it is only time before someone copies it. There is no law yet against 3D printing for personal use. There may be a problem once you copy another's work and start selling it for profit. Overall 3D printing is outside the bounds of normal law. And I believe it will be more profitable for someone to ask for donations rather than try to charge per model.Please leave your comments.
and as always thanks for visiting,The 3D Printing Ninja
3DNinjaneer@gmail.com
Difficulty: Noob
Objective: This post is for those of you who have just started 3D Printing and Computer modeling. There are a few things that I have found absolutely essential to know and would be what I would want to know if I was just starting. Search this blog to find a more in depth post about a certain topic...


Think of the size and amount of the faces that make up the model as high definition. If you want your model to look like an 8-bit video game then use large and few faces. But if you want your model to look 1080p high def then you will need lots of faces that are small. As a rule of thumb all of your faces should look similar to each other in size and shape. The main exception is if certain areas of your model have more detail. For example if you were modeling an arm, the knuckles you need more faces than the rest of the model in order to get the detail of the wrinkles.
The sphere above for example, has bad uniform geometry. Notice how the faces near the equator are compared to those at the poles. They go from squares to rectangles to triangles. This is why I almost never start with a sphere, but rather use a cube and evolve the cube to a sphere by subdividing it.

Only subdivide the geometry when you have no other choice. Subdividing is a way that makes 1 face become 4 faces giving the model more geometry to work with and making better detail. Life would be great if you could subdivide a million times, however the computer can't process that. When you start it will be tempting to simply subdivide the model to acheive what you want. But you will run into a dead end when your computer can't handle it. Therefore if you can make good topology, then you won't need to subdivide the model as much and your computer will love you and you won't be yelling at your computer. It's very easy to go from low definition to high. To see this in action subdivide the square or Suzanne the monkey, to see how easy it is to get better definition. So don't worry if your model looks too blocky it will smooth out in a blink of an eye. Definitely learn to use the multistage tool.

Your geometry can be composed of many shapes, the best is geometry made of all squares. The reason is because squares make editing a model easy. For example you can add or deleted an edge loop like a boss. Other shapes won't. The other common way is to use triangles which is mostly used in video games because less geometry is needed speeding up the processing of the game. But for 3D printing we aren't concerned about how many faces there are, as long as we can model it. Also if you cut a square diagonally in half it becomes two triangles, so if you have to convert it, it is easy. I almost always start my model from a square and almost always only use square faces.

There is usually a tool to find non-manifolds on a model, which are problems the printer has with the model. When you design, often check the model for non manifolds. On Blender this can easily be done in edit mode--}select non-manifolds or hotkey (shift+alt+ctrl+M). A simple way to accidentally create a non-manifold is to duplicate geometry. This can be done by extruding geometry but not actual translating it to a new location. Even more so often when you undo an action make sure you undo enough times. Very often the non-manifolds I find in my models are due not pushing undo enough.
The 3D Printing Ninja
3DNinjaneer@gmail.com
Objective: This post is for those of you who have just started 3D Printing and Computer modeling. There are a few things that I have found absolutely essential to know and would be what I would want to know if I was just starting. Search this blog to find a more in depth post about a certain topic...
To learn how to use Blender see this post: Blender Curriculum: Video Tutorials
1.) Topology
When you design a model for 3D printing, (especially Blender) there a thing called topology which is the geometry that makes the model. If you are like me, at first you won't care about the topology, but eventually you will realize that good topology makes your life so much easier in the long run. Bad topology greatly limits the ability to modify the model, increases the risk of non-manifold problems, and just doesn't look pretty. Just remeber this: If you start with bad topology it's a snowball effect where one little problem becomes thousands quickly. So take your time at the beginning because good topology stays better, bad gets worse. Good topology takes practice to get into good habits while modeling. The following are some of those good habits.
Uniform Geometry
Think of the size and amount of the faces that make up the model as high definition. If you want your model to look like an 8-bit video game then use large and few faces. But if you want your model to look 1080p high def then you will need lots of faces that are small. As a rule of thumb all of your faces should look similar to each other in size and shape. The main exception is if certain areas of your model have more detail. For example if you were modeling an arm, the knuckles you need more faces than the rest of the model in order to get the detail of the wrinkles.
The sphere above for example, has bad uniform geometry. Notice how the faces near the equator are compared to those at the poles. They go from squares to rectangles to triangles. This is why I almost never start with a sphere, but rather use a cube and evolve the cube to a sphere by subdividing it.
Subdivide
Only subdivide the geometry when you have no other choice. Subdividing is a way that makes 1 face become 4 faces giving the model more geometry to work with and making better detail. Life would be great if you could subdivide a million times, however the computer can't process that. When you start it will be tempting to simply subdivide the model to acheive what you want. But you will run into a dead end when your computer can't handle it. Therefore if you can make good topology, then you won't need to subdivide the model as much and your computer will love you and you won't be yelling at your computer. It's very easy to go from low definition to high. To see this in action subdivide the square or Suzanne the monkey, to see how easy it is to get better definition. So don't worry if your model looks too blocky it will smooth out in a blink of an eye. Definitely learn to use the multistage tool.
Triangles, Squares, or Polygons?
Your geometry can be composed of many shapes, the best is geometry made of all squares. The reason is because squares make editing a model easy. For example you can add or deleted an edge loop like a boss. Other shapes won't. The other common way is to use triangles which is mostly used in video games because less geometry is needed speeding up the processing of the game. But for 3D printing we aren't concerned about how many faces there are, as long as we can model it. Also if you cut a square diagonally in half it becomes two triangles, so if you have to convert it, it is easy. I almost always start my model from a square and almost always only use square faces.
Non-manifolds
There is usually a tool to find non-manifolds on a model, which are problems the printer has with the model. When you design, often check the model for non manifolds. On Blender this can easily be done in edit mode--}select non-manifolds or hotkey (shift+alt+ctrl+M). A simple way to accidentally create a non-manifold is to duplicate geometry. This can be done by extruding geometry but not actual translating it to a new location. Even more so often when you undo an action make sure you undo enough times. Very often the non-manifolds I find in my models are due not pushing undo enough.
To learn more about non-manifolds see this post: Non-manifolds: Your Worst 3D Printing Nightmare
Overhangs
Because many 3D printers cannot print mid-air there is a limit to how steep an object can be before it will not print. If you object exceeds this limit then it will need supports. Supports can be messy, so ideally you want to orient and design your model to use no or as few supports as possible.
Please leave your comments.
and as always thanks for visiting,The 3D Printing Ninja
3DNinjaneer@gmail.com
Difficulty: Noob
Objective: If you are just starting to use Blender, menus such as this one probably seem quite intimidating. If I were you I would just ignore most all of these for now. And the modifiers that you should focus on learning are these:

To learn Blender see this post: Blender Curriculum: Tutorial Videos
Multiresolution/Subdivide Surface

First of all I don't know why there is a Subdivide Surface modifier when it does the same thing that the Multiresolution modifier does. But I listed it anyways however I would just always use the Multiresolution modifier, In fact, I don't know if I can recall a time I was using blender and didn't use this modifier. It's a beautiful feature that allows you to do to different levels of subdivisions. Even more so it gives you options of what level to subdivide in the display (Preview) in sculpting (Sculpt). I don't apply this modifier until the nearly the end (as you should for many modifiers) and its powerful to be able to constantly switch levels of subdivisions to work with. So for a square
Array


Think of an array as copy and pasting your object, only with control of how many times to paste and where to paste. Any scene with repeated elements such as a fence or leaves on a plant are perfect to use an array on.
Mirror

One part of art that makes things look beautiful is symmetry. With computer modeling you can mirror your object to make it perfectly symmetrical. Not only does this look great but it also saves you half the time because you only have to do one side. Keep in mind that you can mirror over any line, so you can make complex patterns easily.
Curve

Let's say that you have a straight road that you want to go on a hill. With the curve modifier you can command a 3d object to move onto a curve.
Displace

If you want to put a texture on a model this is the modifier to use. First you will have to subdivide your model into really small faces to get the detail. So this should probably always be the last modifier to use. Then you can add an image that will repeat itself to texturizing your object. It can be really neat. I texturized my phone case i 3D printed to give it more grip because smooth PLA is quite slick.
Remesh

This is a great way to import a CAD model and then add a texture as mentioned above. Remesh modifier takes your model and tries to redo the geometry, to retopologize it. Most likely it will not be the best geometry and it's better to manually retopologize, but it can be useful if you just want to do something like texturize it.
See this post for more details: Remesh Tool
Boolean

Think of this modifier as a way to join 2 objects together. You can combine them, intersect them so only what intersects remains, or cut out of one object where they intersect. Although I will warn you that this leave really funky bad geometry that may need work. But overall this is a very easy way to combine to objects.
See this post for more detail: Boolean Trouble
Please leave your comments.
and as always thanks for visiting,The 3D Printing Ninja
3DNinjaneer@gmail.com


