
How to Split & Separate a Model in Blender
Difficulty: Intermediate
Objective: When you go to print your model, you may realize that you need to better orient your object and realize that you can't because all parts are connected. Or Perhaps you realize that if you split the model into parts, you can print it without supports. This post goes over just how to do this in Blender.

The advantages as seen in the above picture is that this model can be printed without supports and glued together, which is much easier that messing with supports.
Splitting a Model
1.) Knife Tool Method
This can be done in Edit Mode of Blender by:- Choose a proper view (such as side view [1]).
- Knife Tool [K] (Step 2 and 4 may be optional) which creates vertices along a line. This makes it easy to split the object on this line.
- Push the key [Z] to turn on "Cut Through" to create vertices through the entire model and not just the visible part. It also will help to make a perfect cut with [C] as well.
- Hit [Enter] to finish the knife tool. (Steps1-4 can also be done with the bisect tool).

- Duplicate your model [Shift]+[D] and move it (perhaps another layer [M]) so that we can create 2 parts. Duplicate your model as many parts as you want.
- Select all the unwanted vertices (perhaps use the box select [B]).
- Delete [X] the vertices.
- Fill [F] in the hole(s) so you don't have a non-manifold.

- Repeat steps 6-8 to create the other part(s), this time deleting the opposite vertices as before.
- Export the file(s) now as split (you may want to reorient some parts to lay them all flat).
2.) Boolean Method
This can be done in Edit Mode of Blender by:- Copy / Duplicate your model [Ctrl]+[C] or [Shift]+[D]
- Add two cubes that encompass your model [Shift]+[A]
- Scale the cubes so that they encompasses the model [S]
- Position the cubes so that they barely touch
- Use a Boolean Modifier to split the object
- Delete all objects except your now split models.

Separating a Model into Parts
This can be done in Edit Mode of Blender by:
- Selecting a vertex
- Pushing the key [L] to select the object to separate (Blender basically guesses)
- Pushing the key [P] to seperate
- Choose "Selection" from the pop-up menu
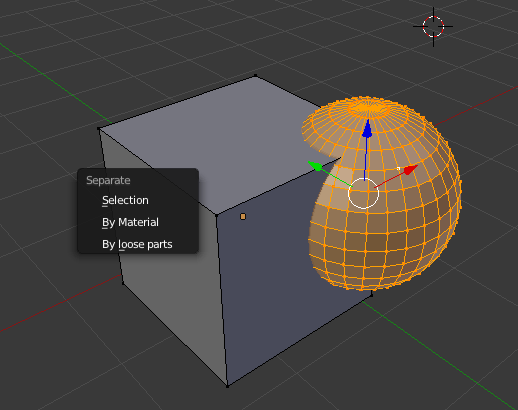
Now when you are in "Object Mode" You should have 2 objects that you can manipulate independently. You can reorient the objects and export them to be printed.
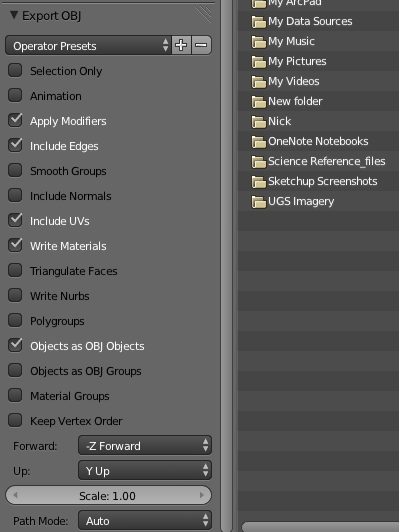
Exporting Only Part of the Model

- Select the object(s) you want to export (select none or all to export all)
- File --> Export --> Choose type (usually an .stl or .obj) (.stl is the geometry only, .obj keeps the textures)
- On the lower left side there may be options of how you would like to export your object, as seen in the picture below.
Please leave your comments.
and as always thanks for visiting,The 3D Printing Ninja
3DNinjaneer@gmail.com
Category: Basics, Blender, Intermediate, Separate, Split, Tricks & Tips


%2B(1).jpg)


0 comments