
Difficulty: Noob


The 3D Printing Ninja
3DNinjaneer@gmail.com
Objective: Learn what, why, and how to use vertex groups in Blender.
What are Vertex Groups?
A vertex group is a selection of vertices that is saved so that at anytime you can select that group again.
What can I do with Vertex Groups?
- Vertex groups are useful because you can quickly apply something specifically to that group
- For example you can choose a material (color) to only apply to a vertex group
- Add a modifier to only a certain vertex group
- Quickly duplicate a vertex group
- Choose certain groups to only paint or sculpt so it does not affect the other parts of the mode
- Hide groups
- Attach bones to groups in animation
- Place hair or particles on a group
How do I make a vertex group?
- Make your Selection of a vertex group
- Go into the Object Data Menu
- Click on the Add button to create a new vertex group
- Name your vertex group (optional, but makes it easy to work with)
- Click assign to make your selection apply to the vertex group that you just created
- At any point in time you can select (or deselect) this vertex group
How do I color a vertex group?

- Make your Selection of a vertex group to color
- Go into the Materials Menu
- Click on the Add button to create a new material (color)
- Name your material (optional, but makes it easy to work with)
- Click assign to make your material apply to your vertex group(s) [Must be in Edit Mode]
- Adjust your material properties (color, transparency, shine, etc.)
Other Things to do with Vertex groups:
- Weight Paint
- UV
- Armatures
- Modifiers
- Sculpting
- Hide
- Particle systems
Please leave your comments.
and as always thanks for visiting,The 3D Printing Ninja
3DNinjaneer@gmail.com
Difficulty: Noob


The 3D Printing Ninja
3DNinjaneer@gmail.com
Objective: Learn how to hide elements to make your workflow easier.
1.) View

This should be obvious, but if not one reason to hide items is so that you can better view your screen. To hide items you can go in the object window and push the eye button or use the hot-key [H]. To unhide the item you can push the eye again or use the hot-key [Alt]+[H].
An example of why you would want to do this is say you have an object in front of another object that you want to manipulate. Instead of messing with your view simply hide the item.
2.) Sculpting
Sculpting can get really messy when you only want to sculpt part of the model. It is hard to not affect parts of the model without hiding it. When you hide things while sculpting, it's like you don't have to color within the lines, you can be as messy as you want. Once again the hotkey to hide is [H] or [B] and you will just need to draw a box to select what you want to hide. Keep in mind that you can use [B] or [H] + [Shift] to invert the selection.
It also is easy to hide geometry by making vertex groups. Then you can quickly select the vertex group to hide or show only.
3.) Memory
The last reason that I can think of why you would want to hide items is because your computer will run faster. When your scene begins to get complex it will start to slow down. If you don't need to see it, then hide it and it won't slow your computer down.
Please leave your comments.
and as always thanks for visiting,The 3D Printing Ninja
3DNinjaneer@gmail.com
Difficulty: Noob


[B] This is an excellent method to select that allows you to draw a box around what will be selected. This is especially useful when using it in a view such as front view [1] (and orthographic [5]). Remember that you can also deselect with box mode with [Shift]+[B].
[C] This will allow you to color over your model and anything within the circle will be selected. You can adjust the circle size by scrolling. When finished with your selection push [Enter] to apply or [Esc] to exit.
[Ctrl] + [Right Click Drag] Draw the shape around what you want to select.
This is a really awesome feature that you will need to know for more advance use of blender. Here are the steps which can also be seen below:
This is not a selection, it is view that will make selection easier. You can go into wireframe with [Z] or using the button seen below. Note that your selection will be both the front and back of your model now.
Another way to select everything in front and in back is to turn on the see through feature by pushing the button. Your model will go see through as seen below.
[L] This is extremely useful as it will guess selections for you. An example is when you want to split an object into two you can use this to select the object. You can also slowly adjust the selection with [Ctrl] + [+] or [-] to grow or shrink it as seen below.

The 3D Printing Ninja
3DNinjaneer@gmail.com
Objective: There are many ways of selecting in Blender. This post goes over the various methods and explains why certain methods are preferred in certain situations over others. The methods are ranked by the most used to least used method.
Right Click Selection
[Right Click] is the way to select something, as this may not be intuitive. As you select something the object with become highlighted.
Multiple Selection
To select multiple objects [Shift]+[Right Click].
Deselection
If you [Right Click] on an already selected item than it will deselect it. The important note here is that [Shift]+(any selection method)= deselection In addition if you accidentally select something you can always undo with [Ctrl]+[Z]. Or redo with [Shift]+[Ctrl]+[Z].
Select All
[A] to select everything. [A] again to deselect everything.

Edge Loop
[Alt] + [Right Click] on an edge between two vertices. This will only work as well as your topology is.
Vertices, Edges, Faces
Usually you should select the vertices, but occassionally it is smart to select the faces or edges. This can be done by changing what you want to select as seen in the image below. This can also be done witht the hotkey [Ctrl]+[Tab].
 Box Selection
[B] This is an excellent method to select that allows you to draw a box around what will be selected. This is especially useful when using it in a view such as front view [1] (and orthographic [5]). Remember that you can also deselect with box mode with [Shift]+[B].

Circle Selection
[C] This will allow you to color over your model and anything within the circle will be selected. You can adjust the circle size by scrolling. When finished with your selection push [Enter] to apply or [Esc] to exit.

Lasso Selection
[Ctrl] + [Right Click Drag] Draw the shape around what you want to select.

Vertex Group Selection
This is a really awesome feature that you will need to know for more advance use of blender. Here are the steps which can also be seen below:
- Make your Selection
- Go into the Object Data Menu
- Click on the Add button to create a new vertex group
- Name your vertex group (optional, but makes it easy to work with)
- Click assign to make your selection apply to the vertex group
- At any point in time you can select this vertex group

Wireframe
This is not a selection, it is view that will make selection easier. You can go into wireframe with [Z] or using the button seen below. Note that your selection will be both the front and back of your model now.

See through selection
Another way to select everything in front and in back is to turn on the see through feature by pushing the button. Your model will go see through as seen below.

Linked Selection
[L] This is extremely useful as it will guess selections for you. An example is when you want to split an object into two you can use this to select the object. You can also slowly adjust the selection with [Ctrl] + [+] or [-] to grow or shrink it as seen below.

Invert Selection
[Ctrl]+[I] will make what you have selected and deselect that and make everything else selected.Random & Pattern Selections
There are also many other methods of selection which you can find within the select menu. The two I will highlight in this post are Random and Checker. Note that you can change the settings of the random select with the small options tat appera in the bottom left hand corner.


Inner Loop Selection
First select an edge loop, as mentioned earlier, then go into the select menu and choose "select loop inner-region" as seen in the image below.
Please leave your comments.
and as always thanks for visiting,The 3D Printing Ninja
3DNinjaneer@gmail.com
Difficulty: Advanced
Objective: When asked, what is the maximum angle I can print? The answer is - It depends.
From all my experience printing objects I have thought up what I call the wiggle theorem. It is an essential idea to know in 3D printing.

Here in Moscow, it is extremely common for women to wear high heels. And one of my pet peeves is when women wear high heels and can't walk normal. Here in Moscow, its likely can run on ice in heels, but in America i see women wobbling all over the place just by walking on a sidewalk and it drives me crazy.
When it comes to 3D printing you don't want your model to be wobble, you want them to be like a Russian in heels. Imagine trying to draw a picture in a rough car ride. Similarly a printer struggles to print on a moving, wobbly surface.

The typical answer to that question is 45 degrees. Others may say something like 60 degrees. But I have seen things print practically horizontally at like 90 degrees perfect. And I have seen things print at a small angle and fail. An that is why I came up with the wiggle theorem. It's not necessarily the angle but a mixture of things found in the wiggle theorem.
This becomes especially important in creating custom supports. A common mistake is to make a tall thin support so it breaks off easily. However even though it is printed vertically so and angle of 0, eventually the height will reach a point where it starts to wiggle and the printer misses the support.
The 3D Printing Ninja
3DNinjaneer@gmail.com
Objective: When asked, what is the maximum angle I can print? The answer is - It depends.
From all my experience printing objects I have thought up what I call the wiggle theorem. It is an essential idea to know in 3D printing.
Here in Moscow, it is extremely common for women to wear high heels. And one of my pet peeves is when women wear high heels and can't walk normal. Here in Moscow, its likely can run on ice in heels, but in America i see women wobbling all over the place just by walking on a sidewalk and it drives me crazy.
When it comes to 3D printing you don't want your model to be wobble, you want them to be like a Russian in heels. Imagine trying to draw a picture in a rough car ride. Similarly a printer struggles to print on a moving, wobbly surface.
How to make it not wobble?
Back to the example of the high heels, you have some factors that make up the heel.Diameter - if the heel is super skinny it will be harder to balance on.
Height - a small heel with a tiny diameter may be easier to balance that a really tall heel.
Angle- if your heel was angled its going to be harder.
The combination of these go into what I call the wiggle theorem. The reason it is important is because it answers questions like: What is the maximum angle before I need supports?The typical answer to that question is 45 degrees. Others may say something like 60 degrees. But I have seen things print practically horizontally at like 90 degrees perfect. And I have seen things print at a small angle and fail. An that is why I came up with the wiggle theorem. It's not necessarily the angle but a mixture of things found in the wiggle theorem.
This becomes especially important in creating custom supports. A common mistake is to make a tall thin support so it breaks off easily. However even though it is printed vertically so and angle of 0, eventually the height will reach a point where it starts to wiggle and the printer misses the support.
Experience is Key
Because every printer is different the results will greatly vary on what your printer is capable of and how much it will violate the wiggle theorem. A wise idea would be to test the limits of your printer. Many of these test can be found online such as:

In Conclusion
You want your model to remain stable and not wiggle at all while printing. Models fail when they become too thin, too tall, and have too much of an angle.Please leave your comments.
and as always thanks for visiting,The 3D Printing Ninja
3DNinjaneer@gmail.com
Difficulty: Intermediate
Objective: Know why you should learn to animate. To know how to animate see the video tutorials on Animating
Most people think that animation and 3D printing are two different subjects. But if you want to make an object with a more realistic effect or make a model look like it was taken mid action, animation is definitely for you. The good news is that the modeling is the hard and boring part, and animation is usually just a few more steps.

There are many options as collisions, fluids, smoke, and as seen below melting.


The 3D Printing Ninja
3DNinjaneer@gmail.com
Objective: Know why you should learn to animate. To know how to animate see the video tutorials on Animating
Most people think that animation and 3D printing are two different subjects. But if you want to make an object with a more realistic effect or make a model look like it was taken mid action, animation is definitely for you. The good news is that the modeling is the hard and boring part, and animation is usually just a few more steps.
Realistic Looking
Imaging modeling something such as a curtain or a cape for a a superhero. It would not only take a long time to model, but probably will take a very long time to make it look real. With animation, you can simple let physics take over and model the cape to imitate real life.
Here is what I printed for my Wacom pen holder.

As stated earlier this can be model much faster with physics and animation, than only modeling.
As stated earlier this can be model much faster with physics and animation, than only modeling.
There are many options as collisions, fluids, smoke, and as seen below melting.
If you are into a more artistic style of 3D printing, then you can create some amazing pieces. And currently I see very few people taking advantage of this. It's a great opportunity in my opinion.
Mid-Action Shots
Imagine watching a movie and then pausing it at any time to 3D print that scene. This is basically what happens when you animate a model. You can pause the animation to capture a specific moment that you would like to print.
To animate a character you typically add in bones (rigging) that make a system of how the model will move. Once that is done your model is like a doll and you can move it in all sorts of positions. So if you wanted to use the same object more than once, this can give it a lot of expression.
Please leave your comments.
and as always thanks for visiting,The 3D Printing Ninja
3DNinjaneer@gmail.com
Difficulty: Noob
Objective: If your object is not rotating, transforming, scaling, etc. as you wish it may be because your origin is not where you want it. This post goes over how to adjust the position of the origin of an object.


The 3D Printing Ninja
3DNinjaneer@gmail.com
Objective: If your object is not rotating, transforming, scaling, etc. as you wish it may be because your origin is not where you want it. This post goes over how to adjust the position of the origin of an object.
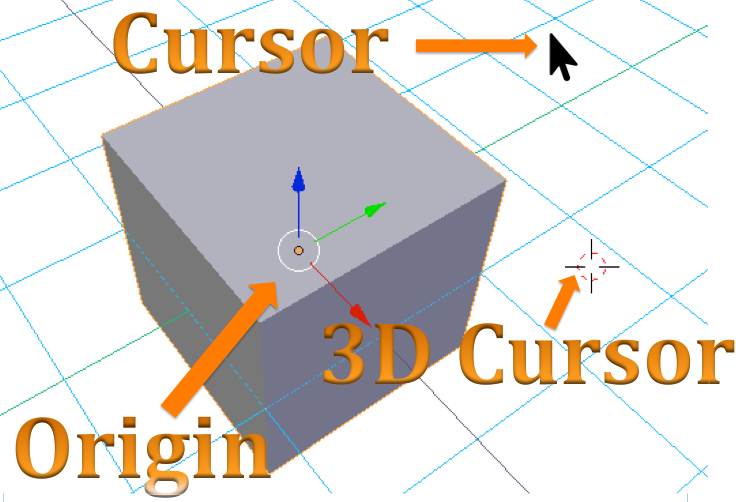
Origin vs. 3D Cursor vs. Cursor
In the Properties Window [T], you can adjust your object by changing you origin. For example if you relocate the origin 5 units to the right, it also therefore moves the object 5 units to the right since your object is dependent on the its origin. The origin is that little orange dot that you see in the picture above. (It may not be even near your object as it can be anywhere.)
Your cursor is what allows you to select and actually do anything. Your 3D cursor is like your cursor, only that you can leave the 3D cursor behind and continue using your cursor.
(If you right click in the box you can reset values to default, which will center your origin or 3D cursor to the center.)
Choose the Origin
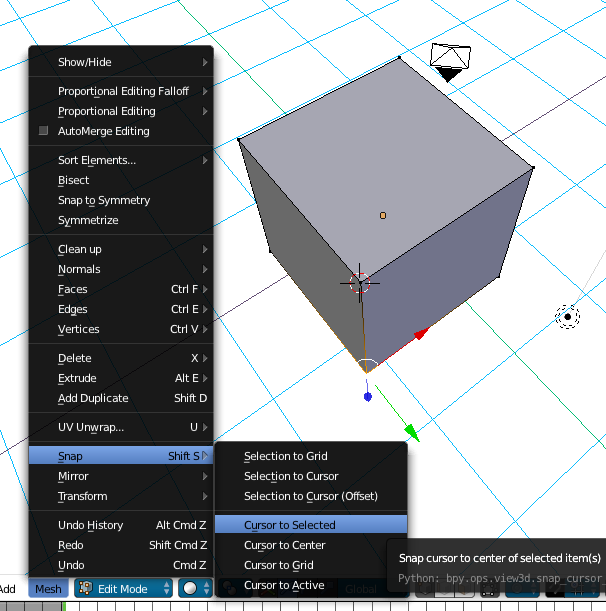
If you added a mesh from blender, your origin is in the center of your object. This is usually ideal, but sometimes you may want to move the origin. In Edit Mode, choose a vertex which you would like to become the new vertex and select it. With practice you will understand where you want your origin.
Move the 3D Cursor to the Desired Origin
Next, "Mesh"--> "Snap" --> "Cursor to Selected". This will move the 3D cursor to that vertex.
Change the Origin to the 3D Cursor
Now go into Object Mode, an then "Object" --> Transform" --> "Origin to 3D Cursor". Now you have change the origin of your object. Note that you can also choose "Origin to Center of Mass" which puts the origin back to the center of your object.
Please leave your comments.
and as always thanks for visiting,The 3D Printing Ninja
3DNinjaneer@gmail.com
Difficulty: Intermediate
Objective: Learn about an excellent add-on to check your models in Blender for 3D printing. The most important check is to make sure your model does not have non-manifold geometry.


The 3D Printing Ninja
3DNinjaneer@gmail.com
Objective: Learn about an excellent add-on to check your models in Blender for 3D printing. The most important check is to make sure your model does not have non-manifold geometry.
3D Printing Toolbox
- Install the add-on in Blender called "Mesh: 3D Print Toolbox" by checking the box and then Save user settings.

- Be in edit mode of the object.
- On the left hand side window, [T], expand Print3D section.
- Input the settings of your printer's capabilities in the Checks section and then push check all.

For 3D Printing the most important checks are:
- Non-Manifold Edge (Holes)
- Intersecting Faces
- Thickness
These should all say 0 next to them. The other checks such as zero faces, zero edges, thin faces, sharp edges, etc. are not really that important.
Another Method of checking your model:
- Go in Edit Mode
- Open up your Properties Window [N]
- Check Mesh Analysis and choose the check
The faces that are colored are the faces that fail the check. The closer the color is to Red, the more of a problem it is. And the more the color is to blue, the less of a problem it is.
Once again the important checks for 3D printing are:
- Intersect(ing Faces)
- Thickness
Please leave your comments.
and as always thanks for visiting,The 3D Printing Ninja
3DNinjaneer@gmail.com
Difficulty: Intermediate
Objective: When you go to print your model, you may realize that you need to better orient your object and realize that you can't because all parts are connected. Or Perhaps you realize that if you split the model into parts, you can print it without supports. This post goes over just how to do this in Blender.

The advantages as seen in the above picture is that this model can be printed without supports and glued together, which is much easier that messing with supports.
Splitting a Model
1.) Knife Tool Method
This can be done in Edit Mode of Blender by:- Choose a proper view (such as side view [1]).
- Knife Tool [K] (Step 2 and 4 may be optional) which creates vertices along a line. This makes it easy to split the object on this line.
- Push the key [Z] to turn on "Cut Through" to create vertices through the entire model and not just the visible part. It also will help to make a perfect cut with [C] as well.
- Hit [Enter] to finish the knife tool. (Steps1-4 can also be done with the bisect tool).

- Duplicate your model [Shift]+[D] and move it (perhaps another layer [M]) so that we can create 2 parts. Duplicate your model as many parts as you want.
- Select all the unwanted vertices (perhaps use the box select [B]).
- Delete [X] the vertices.
- Fill [F] in the hole(s) so you don't have a non-manifold.

- Repeat steps 6-8 to create the other part(s), this time deleting the opposite vertices as before.
- Export the file(s) now as split (you may want to reorient some parts to lay them all flat).
2.) Boolean Method
This can be done in Edit Mode of Blender by:- Copy / Duplicate your model [Ctrl]+[C] or [Shift]+[D]
- Add two cubes that encompass your model [Shift]+[A]
- Scale the cubes so that they encompasses the model [S]
- Position the cubes so that they barely touch
- Use a Boolean Modifier to split the object
- Delete all objects except your now split models.

Separating a Model into Parts
This can be done in Edit Mode of Blender by:
- Selecting a vertex
- Pushing the key [L] to select the object to separate (Blender basically guesses)
- Pushing the key [P] to seperate
- Choose "Selection" from the pop-up menu
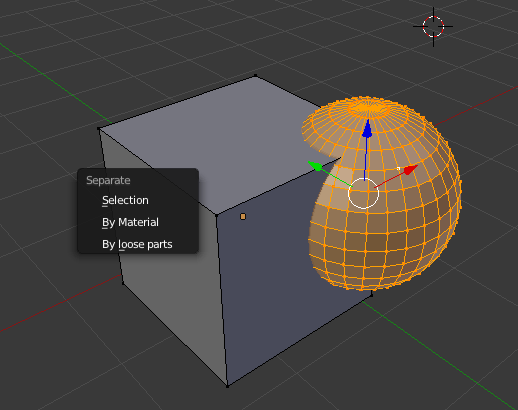
Now when you are in "Object Mode" You should have 2 objects that you can manipulate independently. You can reorient the objects and export them to be printed.
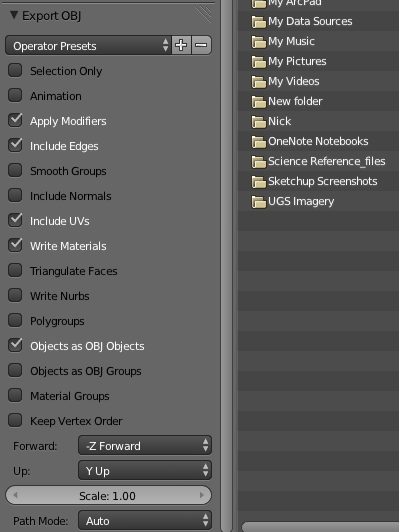
Exporting Only Part of the Model

- Select the object(s) you want to export (select none or all to export all)
- File --> Export --> Choose type (usually an .stl or .obj) (.stl is the geometry only, .obj keeps the textures)
- On the lower left side there may be options of how you would like to export your object, as seen in the picture below.
Please leave your comments.
and as always thanks for visiting,The 3D Printing Ninja
3DNinjaneer@gmail.com
Difficulty: Noob
Objective: If you have never used Blender before and want to know where to start learning how to, this video was made just for you. It was inspired by Tunapanda, whom I will give a shout-out to, and you can find more information about them here: http://www.tunapanda.org.

Noob
These are the video tutorials to learn blender (in recommended order). If there is no link, then that means the video will be uploaded in the near future.
Intro, Dive In:
Object Mode:
Edit Mode:
- Selection
- Scale, Rotate, and Move
- Proportional Editing
- Extrude, Delete vs. Dissolve, Merge, & Fill
- Join, Separate, and Split Parts (Knife Tool)
- Edge Loop
- Mirror
- 3D Printing Checks
- Creating an arm
- Curve Modifiers
- Grid Fill
Sculpt Mode:
- Brushes
- Symmetry
- Background Image
3D Printing:
- 3D Printing Tool-box
- Measuring
Rendering:
- Camera
- Lighting
- Materials
- Textures
- Compositor
Animation:
- Simple Animation
- Rigging
- Collisions
- Cloth
- Liquid
- Smoke
Intermediate
- Retopologize
- Curves
- Arrays
Advanced
- To be Announced
Additional Materials
You can download the curriculum and hotkeys for Blender online here:
Blender Hotkeys
Blender Curriculum
You can download the powerpoints for Blender online here:
Blender: Object and Edit Mode
Blender: Sculpting
Blender: Animation
Blender Curriculum
You can download the powerpoints for Blender online here:
Blender: Object and Edit Mode
Blender: Sculpting
Blender: Animation
Other Useful Tutorials
- If you have questions about Blender this is the best site: http://wiki.blender.org
- I highly recommend looking at these tutorials for modeling, although not necessarily for 3D Printing: https://www.youtube.com/user/AndrewPPrice
- This site also has good tutorials: http://cgcookie.com/blender/
Please leave your comments.
and as always thanks for visiting,The 3D Printing Ninja
3DNinjaneer@gmail.com
Difficulty: Intermediate


Objective: Use the software, Autodesk Meshmixer, to automatically apply better supports for printing.
What are Supports?
Supports are extra printed material that are separated from the model after printing. Their purpose is to keep the model stable and give the printer something to print on since a printer can't print on air. Supports are what makes a 3D printing affordable and what will drive you mad. Being able to do good supports is the most valued skill in consumer 3D printing in my opinion.
For more information on supports see this post:
http://3dprintingninja.blogspot.com/2014/10/supports.html
For more information on supports see this post:
http://3dprintingninja.blogspot.com/2014/10/supports.html
Steps Before Adding the Supports:
- Create your model, check for non-manifolds (this can be done in Autodesk Meshmixer- >Analysis-->Inspector). See: http://3dprintingninja.blogspot.com/2014/07/non-manifolds-your-worst-nightmare.html
- Scale and Orient your object (Autodesk Meshmixer-->Edit-->Transform). If possible it would be wise to import your model already properly scaled into Meshmixer. Otherwise the supports will be disproportional to your model upon adding them.
Supports via Meshmixer?
- Autodesk Meshmixer-->Analysis-->Overhangs)
- Select your printer - This will default many of the values for you
- This determines where to put the support. 45 is a normal value, I would not suggest going over 60
- This is how easy the support will be to break off the model. I recommend .4mm. The smaller the value the easier it will be to break off, but also the less likely it will print correctly.
- This is basically how many supports
- This is how thick the support will be. This depends on how high your support is. The higher or more angled a support the bigger thickness required. See the post on the Wiggle Theorem...
- This is what will be printed onto the bed for the support. I think the bigger the better on this option if material cost isn't an issue.
- There are controls which I skipped because they aren't that important. To learn more about them follow this link: https://www.youtube.com/watch?v=aFTyTV3wwsE Otherwise push generate support.
- If you are happy with it then push convert to a solid.
- Export your file to be printed. (Both steps 9 and 10 can take a long, long time. It may appear as if the program is frozen. I recommend minimizing the window and working on something else or taking a break and come back to it)
- If you are not happy then you can push remove support, and repeat the above steps by tweaking the settings.
Most Likely at Step 8,
You will find that the supports generated are not quite right. Luckily, Meshmixer allows you to add and delete your choice of supports. I rarely do not delete and add a few of my own supports to the model.
- To add a support, click and drag the mouse. I recommend starting in a blue are or at a previous support. While adding the support you will notice that the color of the support will change from green to yellow to red. Green is go, stay in the green. Otherwise if it is red it probably won't print.
- To delete a support, ctrl+click
- You can also have multiple sizes of supports. For example you can start by adding a thicker supports. And then redo the process but with smaller supports
Conclusion
Although this process may seem difficult, it will save you frustration of taking off the supports. It is not a perfect method, however it is constantly improving and in my opinion the best method of adding supports without fully customizing each support yourself.
When Adding Supports...
- Make sure that there is open space between the model and the support, otherwise your model will fuse with the support. It is not a huge deal, only that you will need to cut off the support.
- If you make the supports too small it will jam the printer, depending on the printer.
Examples of the need to use Meshmixer
This was a Cathedral that was being printed by floors. As you can seen the 2nd floor failed to print as the angle at the tops of the window was too steep to print. Therefore supports need to be added. If this was done with the printer's automatic supports, it would be a mess of supports. With Meshmixer, you can nicely add a few supports.
Let me know your thoughts:
And as always thanks for visiting,
The 3D Printing Ninja
3DNinjaneer@gmail.com


%2B(1).jpg)


