
Difficulty: IntermediateObjective: Learn how to go about printing jewelry, specifically custom wedding rings, and hear my experience with doing so.

Why you should 3D print your wedding ring?

At first I didn't even consider 3D printing, however my wedding band shopping experience was so unsuccessful that it led me to 3D print a ring. I had looked at dozens of stores in person and online but could not find anything that I would want on my hand everyday, for the rest of my life. I wanted to have a ring that was unique, symbolic, simple, geometric, fit my style, and something I felt attachment towards. I found a store that did custom design and became interested in going that route. It was then that I realized that instead of paying someone else $600 to design a ring that they would 3D print, that I could do it myself.
So within about 30 minutes I had created a custom design ring using Blender, drove to a jewelry store, and it was ready to be 3D Printed and completed in a day. I saved $600 in design fees, have the ring of my dreams, and it is more special to me because I am the creator of it. Also I should mention that I still had not found a ring days before my wedding, so being able to complete the whole process in less than 24 hours was a huge plus. And most importantly, it is awesome.
How to actually 3D print it?
Designing Your Ring
The first step is to come up with the 3D model, which can be done with free software such as Blender or Autodesk 123D Design. For most ring designs, anyone can quickly learn enough of these programs to create their dream ring. So I highly recommend looking into designing the ring yourself no matter what level or skills you have in 3D modeling. If you don't want to design the ring yourself, then you can hire someone else to design it for you (animator, engineer, industrial designer, etc. should have the capabilities).
The next step is the harder one which is to make sure your model can be printed. Or in other words that it is manifold geometry. See these posts for more detailed information:
Finding a Printer
The last step will be finding a place to print your model. For most printing companies they will print your model in plastic first and then make another mold using that plastic part. This new mold will then be injected with the material, for example, gold will be melted down and ejected into the mold. Lastly the mold will harden and then be put in a tumbler/ polishing device in order to make the ring look good.
You will be surprised how many businesses nearby will be willing to do this. When I made mine I was in Reno so I choose http://www.bvwjewelers.com which I would highly recommend. But you could also find a company online such as Shapeways that you can email your design and have your ring mailed to you.
How much does it cost to 3D print a wedding ring?
Design Cost
For me it was free (or 20 minutes of my time), otherwise this will depend on the designer. The store I went to charged $600 to design it, but as I mentioned earlier, I believe most people should and can design it themselves.
Material Cost
The price here varies greatly. I love yellow gold and knew that was the only material that I wanted. So for me the material cost was about $650, however if I was to print the ring in Silver it would have been only $40. If I choose platinum then the cost would have easily been in the thousands.
3D Printing Cost
This will depend on the company, my cost to print the ring in plastic and make the mold was $125
Company Charges & Tax
There may be some other charges for service, polishing, and taxes which may add a couple hundred onto the cost.
Total Cost
As many of these categories greatly vary, I believe the cost is anywhere from $150 to $2000, mine was about $900 due mostly to the cost of gold.
What materials can I print in?
Gold, Platinum, Silver, Aluminum, Rubber, just about anything you would want. Here is a list of the materials shape ways uses: Materials
What I Learned and Would Recommend
- Go to a store in person and try on various rings because what you want changes when its not just a picture and actually on your finger (Weight, Size, Color, Material, Thinkness, etc.).
- Make sure the 3D Printer can handle the detail.
- Most printers will charge the same cost to print 1 ring or 10 rings, so print as many as you can or perhaps different rings all at once to save money. Print cuff links, earrings, etc.
- Look up ring design tips. For example, I knew I wanted a comfort fit so I beveled the edges of my ring. Don't make the ring too thin.
And, yes I just got married, hence why there hasn't been any recent posts.

Please leave your comments.
and as always thanks for visiting,The 3D Printing Ninja
3DNinjaneer@gmail.com
Difficulty: Advanced
Objective: 3D Print any geographic location. The lazy methods are found near the bottom of this post.


Note: This could have all been completed in Blender starting with the JPEG image found in the downloaded folder. You would open Blender and then use the displace modifier on a subdivided plane, see this tutorial for info on how to. But Sculptris handles the detail better without crashing as Blender would have.
I used ArcMap (not free), an Esri GIS product to import the DEM information. I unzipped the file and then imported the raster dataset.

 3. The Terrainator is also very similar to the method above, except that you can't download the model and are forced to print the model through Shapeways.
The 3D Printing Ninja
3DNinjaneer@gmail.com
Objective: 3D Print any geographic location. The lazy methods are found near the bottom of this post.
USGS Method:
1.) Obtain Geo-spatial Information
First, we need to obtain DEM (digital elevation model) data, which we can get from USGS. You can enter coordinates or draw a box as seen in the image below:


Finally on the left hand side of the page you can checkout, which will ask for your email to send you a link to download.


Next, choose what data you want to download. In our case, "Elevation DEM Products" and then choose one of the options with "Arc Grid."
Finally on the left hand side of the page you can checkout, which will ask for your email to send you a link to download.
2.) Convert the Info into a Model
Next Open Sculptris, which we will be using because it can handle more geometry and is faster. See the image below for help with the steps.

Next we will use Blender to make this model 3D Printable. First we need to convert the model to an stl format. We can do this by importing our model from Sculptris into Autodesk Mesmixer. Then export the model out of Meshmixer and import it into Blender. Once imported in Blender:
- Replace the sphere with a plane - because the world is flat
- Turn off symmetry - we don't want it
- Subdivide the plane a few times (like 5) - the more subdivisions, the more detail
- Upload your height map image for the brush and make sure to enable it
- Adjust the size, strength, detail, etc.
- Zoom to the correct distance, get a top view, click once, and export it. (this may take a few atempts to get right)
Next we will use Blender to make this model 3D Printable. First we need to convert the model to an stl format. We can do this by importing our model from Sculptris into Autodesk Mesmixer. Then export the model out of Meshmixer and import it into Blender. Once imported in Blender:
- Go into Edit Mode [tab] (convert triangles-->squares with alt+j)
- Select the Edge Loop [alt + right click]
- Extrude [E]
- Flatten out the vertices [S+(X,Y,orZ)+0]
- Fill in the hole [F]
- Export your model that you can now print!
Note: This could have all been completed in Blender starting with the JPEG image found in the downloaded folder. You would open Blender and then use the displace modifier on a subdivided plane, see this tutorial for info on how to. But Sculptris handles the detail better without crashing as Blender would have.
I used ArcMap (not free), an Esri GIS product to import the DEM information. I unzipped the file and then imported the raster dataset.
3.) Export the Model
Finally export the model as an stl.
4.) Fix the Model
The model may have non-manifold errors (holes, separate parts, etc.) This is the hardest step in the process and will require an understanding of non-manifolds. Perhaps the easiest method is to upload the model(.stl) into the netfabb cloud, although this may not work. If it doesn't then you will need to try other methods found in the following post. I would start with Meshlab. An easy way to see the errors is in Meshmixer as seen in the image below.
Also one method may not be enough, as multiple methods may be needed to fix the model.
If you do not do this step then your model may not 3d print properly.
Also one method may not be enough, as multiple methods may be needed to fix the model.
If you do not do this step then your model may not 3d print properly.
5.) Prepare & Print the Model
You may need to choose a side for the supports to be printed on. This should probably be the side that you care the least about the appearance of. You may also need to orient, scale, split, add a raft, etc.
It should be noted that these models are often complex and can take days to print, so make sure you are not on a deadline to have it printed. Also note that it may take a couple of hours for this model to slice alone.
If you do not have a printer check out 3D Hubs to get your model printed in sandstone (full color).
If you do not have a printer check out 3D Hubs to get your model printed in sandstone (full color).
Google Earth Method
http://www.thingiverse.com/thing:15276/#instructions
The Lazy Methods:
- Many common landscapes, such as famous mountains, are already a model ready to be printed. You can search for the model and download an .stl file of it. Try Thingiverse.
- You can quickly obtain a rough model from this website as seen in the image below. Type in coordinates, or use the center to view button to make a selection as seen in the red rectangle. The Arc/seconds will make the selection larger, or just zoom. Finally push the button create STL file.
3. The Terrainator is also very similar to the method above, except that you can't download the model and are forced to print the model through Shapeways.Please leave your comments.
and as always thanks for visiting,The 3D Printing Ninja
3DNinjaneer@gmail.com
Difficulty: Advanced
Objective: Take MRI data (brain, heart, bone, etc.) and 3D print it.
Software Needed (free):
- OsiriX (Mac only), Invesalus, 3D Slicer, Seg3D, or ImageVis3D - To get the MRI data into a model
- Meshlab, Netfabb, or MeshMixer- To fix the Model so that it can print

1.) Obtain the MRI data:
You should be able to obtain a DICOM (.dcm) file from your doctor. If not you can find some free online such as NBIA.

2.) Restrict the View
Now we need to open our DICOM file in a software program mentioned above and then limit the view to what we would like to print. In the image below what is highlighted in green is what will be printed.

3.) Export the Model
Once we have the model in view we need to convert it into an .stl file which can then be printed. To do this we need to make a surface construction first and then export the file. Follow the steps in the software. This may take a while and slow down your computer, there should be a loading bar to see the progress (probably in the bottom right corner).
4.) Fix the Model
Most likely the model will have many non-manifold errors (holes, separate parts, etc.) This is the hardest step in the process and will require an understanding of non-manifolds. Perhaps the easiest method is to upload the model(.stl) into the netfabb cloud, although this may not work. If it doesn't then you will need to try other methods found in the following post. I would start with Meshlab. An easy way to see the errors is in Meshmixer as seen in the image below.

If you do not do this step then your model may not 3d print properly.
5.) Prepare & Print
You will need to choose a side for the supports to be printed on. This should probably be the side that you care the least about the appearance of. You may also need to orient, scale, split, add a raft, etc.

It should be noted that these models are often complex and can take days to print, so make sure you are not on a deadline to have it printed. Also note that it may take a couple of hours for this model to slice alone.
Please leave your comments.
and as always thanks for visiting,The 3D Printing Ninja
3DNinjaneer@gmail.com
Difficulty: Intermediate
Object: Create a model from an image. This is also how you can easily create a cookie cutter, cake topper, etc. Scroll to the bottom to see the easiest way to create a cookie cutter.

Theses are the outlined steps as well as different methods you can choose in each step.


The 3D Printing Ninja
3DNinjaneer@gmail.com
Object: Create a model from an image. This is also how you can easily create a cookie cutter, cake topper, etc. Scroll to the bottom to see the easiest way to create a cookie cutter.
Theses are the outlined steps as well as different methods you can choose in each step.
- Find an image
- Image Search
- Computer or Hand Drawing
- Photo
- Convert that image into a path
- Inkscape
- Illustrator (not free)
- Convert that path into a model
- Blender
- Photoshop (not free)
- Autodesk 123D Design / Other Program
This image was take off of Google and transformed into a 3D model:
1.) Find an Image
a) Use an image from online
If you use the "Search tools" and refine the search by "Colors" and then choose either "Full Color" or "Black and White" it will make this process much easier.
b) Use a Photo
This will take editing skills an much more time, however you can create a really neat end product. More info coming soon...
c) Use a Drawing (Computer or Hand Drawn)
This will take editing skills an much more time, however you can create a really neat end product. More info coming soon...
2.)Convert Your Image to a Path
a) Inkscape
- Paste your image, select it, and then go to "Path" --> "Trace Bitmp"

- Change the thresholds of how it determines to create the path. You can push "Update" to preview the path. Only push "OK" once as it will create a path. Once you push ok, then close the window. I found that changing the "Colors" to less than 8 helpful as well as "Color quantization" and "Invert Image"

- Finally save you selected path as an .svg
- Optional: You may want to offset your path to create another .svg file that will become the thick base as seen on one end of a cookie cutter. This will require the Boolean Modifier as well.
- Import your image into Adobe Illustrator
- Convert your image to a path by pushing " Image Trace". Then Push "Expand" as seen below. (There are more advanced settings for "Image Trace" in the triangle button to the right of "Image Trace". My image is simple, but if your image is more complex / more colors then one of these advanced options will be better for you to choose.)

- Double Click on your image and then start deleting unwanted paths. (I clicked+dragged on the white areas of my image and deleted them, leaving me with only the paths that make up the black area.) You can also just choose the paths that you want. Either method works, I prefer deleting everything I don't want.

- Save your path as an .SVG file. This type of file can now be imported into just about every 3D modeling software.

- Optional: You may want to offset your path to create another .svg file that will become the thick base as seen on one end of a cookie cutter. This will require the Boolean Modifier as well.
3.) Create a Model from your Path
a) Blender
- Import your SVG file. You may need to scale your paths because they often import extremely small. You can do this by pushing [S] and typing a number such as 2000... and just add zeros to that number until you see your paths.

- Optional:If your paths did not turn out as expected, then you can go back into Illustrator and try to make or edit the paths. (Or in Edit Mode of Blender you can modify the paths.)
- If you are happy with the path, then convert your paths into a mesh. [Alt]+[C] in Object Mode. You may need to join your paths as one object, or convert multiple times.
- Now your path has geometry to model with. In my case I will select all the vertices and then extrude them upward.

- I also changed my material color from black to blue so that I could see it better. You model will be whatever color your path was as an .svg file.
b) Photoshop
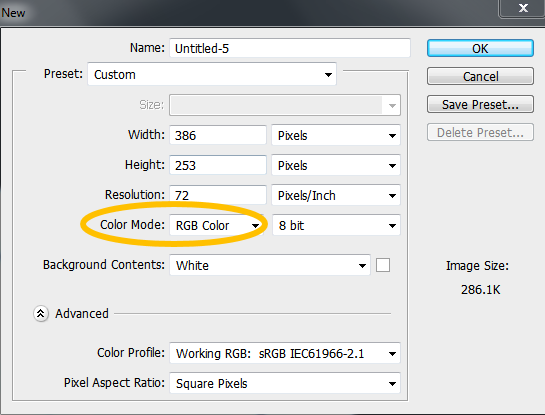
- Make sure you choose RGB Color not CMYK when starting a new project in Photoshop, otherwise the 3D function will not work.
- Paste your path

- In the top window choose 3D--> New Extrusion from Path. This will make your path a 3d model.
- Modify the 3d model

c) Autodesk 123D Design / Other Software
- Import your path. If you choose as a solid, you may need to delete some parts of the solid because it may extrude more than desired. This way is quicker than sketches usually as it does most the work for you.

- If you choose sketches, then you will need to extrude those sketches as seen in the image below.

- Then modify your model as desired.
Cookie Cutter, The Easiest Method
Cookie Caster
Click on the above link to create cookie cutters online. This is a very easy method for simple cookie cutters, but lacks the features for more advanced cookie cutters. The site is free and will give you a quick tutorial when starting.
Please leave your comments.
and as always thanks for visiting,The 3D Printing Ninja
3DNinjaneer@gmail.com


